Wednesday, 31 August 2016

SHABBY ROSE COLLECTION
Tag – Shabby Chic
-Tanya Cloete-


For This Project You Will Need:

·         FabScraps Shabby Rose Collection paper range : C85 004 & 006
·         FabScraps Sticker Sheet ST85 002 (Shabby Chic)
·         Silhouette Cameo
·         Creative Expression Die Grand Vinery
·         Couture Creations Die Classic Leaf
·         Green, Brown & Cream Cardstock
·         Cream Patterned Paper
·         Tim Holtz Distress Ink Gathered Twigs
·         Metal Embellishments, Flat Pearls, Ribbon and Trims

Instructions:
1.      Silhouette Cameo:
·         Cut a large tag from green cardstock and the internal offset from sheet 004. Ink the edges with gathered twigs. Place ribbon through hole of tag and make a bow as per the picture.
·         Cut 2 flowers from sheet 004 and 006.  Remember to cut 3 of each of the same size.  Mine are various sizes so you can choose how big or small you want yours to be.  Assemble the paper roses…you can follow this link on how to make the paper roses https://www.youtube.com/watch?v=skuSJcYNC3E.
·         Ink the edges of the paper roses with gathered twigs.
·         Cut an owl from green cardstock and the offsets from brown.
2.      Place sticker 002 (Shabby Chic) onto white cardstock and matt onto green and repeat using brown and cream.
3.      Cut 4 leaves using the grand vinery die from cream patterned paper.
4.      Cut 2 leaves using the classic leaf die from sheet 004 and ink the edges with gathered twigs. Remember to keep the inner piece of these to add randomly to tag.
5.      Arrange the rest of the embellishments as per the picture and glue!
6.      All Done!


SHABBY ROSE COLLECTION
Card – My Best Friend
-Tanya Cloete-


For This Project You Will Need:

·         FabScraps Shabby Rose Collection paper range : C85 005
·         FabScraps Chipboard Pieces : DC 85 007
·         Silhouette Cameo
·         Pink & White Cardstock
·         Lindy’s Stamp Gang Embossing Powder Chateau Rosé & Merci Beaucaup Mint
·         Floral Wooden Heart

Instructions:
1.      Silhouette Cameo:
·         Cut 2 hearts from sheet 005 and offsets from pink cardstock.
2.      Cut a 6x6 card from pink cardstock and matt with white.
3.      Cut 6 strips (same length) from sheet 005. Add to the white cardstock as per the picture.
·         Emboss chipboard piece 007 with Chateau Rosé (word only) and the heart with Merci Beaucaup Mint.
4.      Arrange the rest of the embellishments as per the picture and glue!
5.      All Done!


SHABBY ROSE COLLECTION
Tag – Forever
-Tanya Cloete-


For This Project You Will Need:

·         FabScraps Shabby Rose Collection paper range : C85 005 & 008
·         FabScraps Sticker Sheet ST85 002 (Forever)
·         Silhouette Cameo
·         Pink, Blue & White Cardstock
·         White Gesso
·         White & Pink Acrylic Paint
·         Ranger Embossing Powder White
·         Metal Embellishments, Flat Pearls, Lace and Trims

Instructions:
1.      Silhouette Cameo:
·         Cut a large tag from pink cardstock and the internal offset from sheet 005. Paint he edges with pink and white paint. Add the lace through the hole of the tag and make a bow as per the picture.
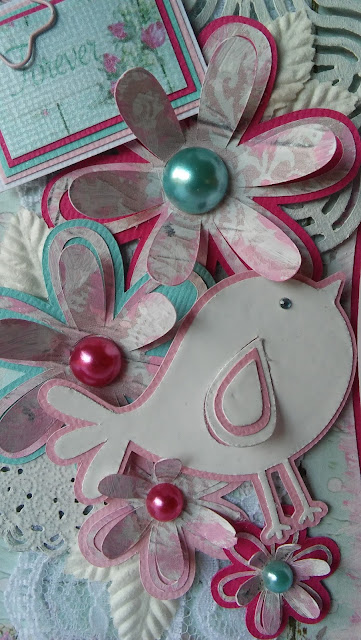
·         Cut four 3d cut-out flowers (various sizes) from sheet 005 and offsets for those from blue and pink cardstock. Randomly paint with white paint and add the flat pearls as per the picture.
·         Cut a little bird from white cardstock and emboss with white.  Cut an offset from pink cardstock.
2.      Place sticker 002 (Forever) onto white cardstock and matt onto pink and repeat using blue, pink again and white. Add the metal paper clip.
3.      Paint the metal embellishments with white gesso and leave to dry.
4.      Arrange the rest of the embellishments as per the picture and glue!
5.      All Done!


SHABBY ROSE COLLECTION
Step Card – Family
-Tanya Cloete-


For This Project You Will Need:

·         FabScraps Shabby Rose Collection paper range : C85 002, 005 & 006
·         FabScraps Sticker Sheet ST85 002 (Family)
·         Fabscraps FAB Stencils DS 008
·         Silhouette Cameo
·         Memory Box Die Lunette Butterfly
·         Memory Box Die Kaleidoscope Butterfly
·         Pink, Blue & White Cardstock
·         Diamond Stickles
·         Light Paste
·         White & Pink Acrylic Paint
·         Metal Embellishments, Flowers, Flat Pearls & Rhinestones, Resin Angel, Wreath Heart and Trims

Instructions:
1.      Silhouette Cameo:
·         Cut a step card from blue cardstock and contrasting accents from pink and sheet 006. Paint the edges of the strips from sheet 006 with white paint.
·         Mix light paste with pink paint and add to the middle contrasting accent sheet using FAB stencil 008 and leave to dry.
·         Cut 3 hearts using sheets 005 & 006 and paint the edges (only 2 hearts) with white paint.
·         Cut 4 flowers from the remaining sheets to make paper roses.  Remember to cut 3 of each of the same size.  Mine are various sizes so you can choose how big or small you want yours to be. Assemble the paper roses…you can follow this link on how to make the paper roses https://www.youtube.com/watch?v=skuSJcYNC3E.
·         Randomly paint the paper roses with white paint.
2.      Place sticker 002 (Family) onto white cardstock and matt onto pink and repeat using blue and white.
3.      Cut 2 butterflies using the Lunette die from pink cardstock (randomly paint with white) and Kaleidoscope butterfly from sheet 002. Place in the middle and add the mini rhinestones to the centre.
4.      Cut 4 leaves using the classic leaf die from sheet 005.
5.      Add diamond stickles to the wings of the resin angel.
6.      Paint the wreath heart with white paint.
7.      Arrange the rest of the embellishments as per the picture and glue!
8.      All Done!


SHABBY ROSE COLLECTION
Circle Flip Swing Card – Best Wishes
-Tanya Cloete-


For This Project You Will Need:

·         FabScraps Shabby Rose Collection paper range : C85 001 & 008
·         FabScraps Sticker Sheet ST85 002 (Best Wishes)
·         Fabscraps FAB Stencils DS 012
·         Silhouette Cameo
·         Grey, Pink & White Cardstock
·         Light Paste
·         White Acrylic Paint
·         Metal Embellishments, Flowers, Flat Pearls, String and Trims

Instructions:
1.      Silhouette Cameo:
·         Cut a circle flip swing card from grey cardstock and the contrasting circles from sheet 001 & 008. Paint the edges of one of the circles with white paint.
·         Add light paste to the front and back section of the card using FAB stencil 012 and leave to dry.
·         Cut 2 flowers from the remaining sheets to make paper roses.  Remember to cut 3 of each of the same size.  Mine are various sizes so you can choose how big or small you want yours to be.  Assemble the paper roses…you can follow this link on how to make the paper roses https://www.youtube.com/watch?v=skuSJcYNC3E.
·         Randomly paint the paper roses with white paint.
2.      Add pearls to the metal butterflies.
3.      Place sticker 002 (Best Wishes) onto white cardstock and matt onto pink and repeat using grey and white.
4.      Arrange the rest of the embellishments as per the picture and glue!
5.      All Done!


SHABBY ROSE COLLECTION
Card – Blessings
-Tanya Cloete-


For This Project You Will Need:

·         FabScraps Shabby Rose Collection paper range : C85 001, 005 & 008
·         FabScraps Sticker Sheet ST85 002 (Blessings)
·         FabScraps FAB Stencils DS 050
·         Silhouette Cameo
·         Memory Box Die Kaleidoscope Butterfly
·         White, Blue, Turquoise & Pink Cardstock
·         Ranger Embossing Powder White
·         White & Mint Acrylic Paint
·         White Gesso
·         Light Paste
·         Metal Embellishments, Flowers, Flat Pearls, String, Wooden Spoon and Trims

Instructions:
1.      Silhouette Cameo:
·         Cut 2 teacups from sheet 005.
·         Cut a small bow from pink cardstock.
2.      Fold a 6x6 card from white cardstock and matt with pink and repeat using white.
3.      Cut sheet 001 to fit matted white cardstock and a small piece (same size) from sheet 008. Trim sheet 001 a bit and place piece from sheet 008 behind 001. Make sure that it is visible.
4.      Mix some light paste with mint paint and add to sheet 001 using FAB Stencil 050 (flower section only) Leave to dry.
5.      Add the teacups and flowers (randomly paint the edges of the flowers with white paint) as per the picture.
6.      Cut a butterfly from turquoise cardstock using the Kaleidoscope butterfly.
7.      Emboss the wooden spoon with white. Add the butterfly, string and bow as per the picture.
8.      Paint the metal butterflies with white gesso and leave to dry. Add to the teacups.
9.      Place sticker 002 (Blessings) onto white cardstock and matt onto blue and repeat using white and pink.
10.  Arrange the rest of the embellishments as per the picture and glue!
11.  All Done!


C86 MOTHER EARTH COLLECTION
Bird Cage Album - by Jeanine de Bruyn


Requirements-
2 sheets of C86 003(Natures garden)
2 sheets of C86 002 (Botanical Bulb)
1 sheet of C86 001
1 sheet of C86 004
Sticker sheet ST86 001
6 Square envelopes (mine were 16 x16cm)
2piecesof chipboard for the cover of the album
Cream, Brown and Green cardstock.
Lace, Ribbon and Embellishments of your choice.

Directions-
I started by cutting off the envelope flaps then cutting off 1cm from the left side and 1 cm from the top of each of my envelopes these will be the pages for your mini album.
To make the binding I cut 5 pieces measuring 3 cm across x 15cm down, I used the C86 002 paper. I then scored each piece at 1cm mark and then again at 2cm mark and folded them. You should have 5 pieces that resemble hinges now, attach them to each other (see attached photos).

To bind the album glue the envelopes to the binding pieces you have made, they should slide into the open side of each envelopes(see attached picture).
For the cover of the album, I painted the edges of the chipboard pieces black then covered 1 of the pieces with the C86 002 paper and the other piece with C86 001.
I then glued the back of 1 of my chipboard pieces (C86002 on) to my first envelope and the back of the last chipboard piece (C86 001 on) to the last envelope. Now your cover is attached to the album.

To make the flaps on the pages, you will need a piece of patterned paper of your choice measuring 14cm across and 12cm down. On the 12cm side score it at 2cm, then fold on the score line. Add glue to the front and back of the 2cm piece and slide it into the top of your envelope, now you have your flap, I only made 2 flaps in my album.

Cover each of your pages with patterned paper and embellish as desired.
I distressed and chalked all of my papers before glueing them to my envelopes, I cut my papers a little smaller than the envelopes so that a piece of the envelope still showed.
I fussy cut a lot of the images from the papers and stamped and embossed butterflys and doileys onto vellum then cut them out and used them to embellish my pages. This is also a nice way to use up all those bits and pieces of lace, ribbon, stickers  etc. that you have left over from other projects.
I have a short video on which I explain how I decorated each of the pages as well as the front cover.
You can also get a better idea of what I did from the attached photos.

Hope you have fun creating your own mini album.


C86 Mother Earth Collection Tag by Bev Code


FOR THIS TAG YOU WILL NEED:

Supply List:
Paper: C86 Mother Nature Collection
Ink: Tim Holtz mini pad
Stencil: The Crafters Workshop
Punch: Kreaxions
Die: Memory Box
Others: flowers, leaves, ribbons, beads, cardstock, twine

INSTRUCTIONS:

STEP #1: Making tags are fun and easy. They are small and that allows you to use stash from collections after you done making the big products first. Up first then is to pull lots of scraps that coordinate, cardstock and lots of options for accents.


STEP #2: As per above photo I pulled lots of papers….. cut the cardstock base roughly 3" x 6"  standard size and using the prints I cut pieces, die cut an accent, punched a border and made some matted pennants. 


STEP #3: I punched the corner of this tag base on the upper corners only. Ink all the edges, ink through stencil on the upper right corner.  The Post Card piece is fussy cut from the print paper.


STEP #4: We can assemble the layers now matting some for extra colours, layers and shapes. By doing this process first it allows us to wrap twine around the whole piece. 


STEP #5:  Now we put together the back piece .... adding the die cut honey combs, inked stenciling and on the lower edge the floral punched border.

STEP #6: Now put the 3 layers together using a tilt position. 


STEP #7: Assemble the 2 clusters of flowers with leaves and the bigger one I wrapped the stems with ribbon and tied off with a bow. Position the clusters and glue down. 

STEP #8: Punch the circular hole.... tie off with coordinating ribbons and a stand of beads. Just remember… lots of paper and accent options….. enjoy and have fun when creating tags.


Thanks for joining me today.