For this layout you will need;
Fabscraps C85 001
Peeled Roses
Fabscraps
C85 007 Lattice Roses
Fabscraps
C85 008 Rose Wood
Fabscraps
C85 002 Rose Door
Fabscraps
FL3 01 Cream Burlap Flower
Fabscraps
E7 069 Oyster trinket
Flat canvas
– 14 x 10 inches
Small wooden
shadow box
Black
cardstock
Selection of
pink paper roses
White fabric
flower
Gauze
Pink
distress ink
Black chalk
Black
microbeads
Pink sequins
Black mist
Black polka
dot ribbon
Title
chippie – Hello Beautiful
Pink glitter
glue
Tombow &
Glue gun
Foam tape
Canvas Base
·
Cut four pieces each from C85 001 (polka
dot side) and C85 008 (filigree side) to measure 5 x 3.5 inches. Chalk the edges with black and distress
·
Arrange these in alternating blocks to cover
your base canvas and adhere with Tombow.
Adhere a strip of ribbon to the right hand side with your glue gun. Set aside so that all the glue dries
completely
Shadow
Box
· Cut strips of C85 001 Peeled Roses (polka
dot) to measure the outer frame of your shadow box. Adhere with Tombow, and once dry, sand off
any overlapping edges
· Measure and cut C85 001 Peeled Roses
(floral side) and C85 002 Rose Door (stripes) to fit in the four inners
of your shadow box. Alternate these, ink with black and distress
the edges and then adhere to the inner boxes with Tombow
· Adhere your entire box to the upper section of
your base canvas using Tombow glue.
Leave for at least overnight before you finish off your canvas
Finishing
Touches
· Fussy cut some flowers from C85 001 Peeled
Roses, C85 007 Lattice Rose and C85 002 Rose Door; fussy cut one
hinge from C85 008 Rose Wood
·
Coat your title chippie in some pink glitter
glue and set aside to dry
·
Chalk around the outer edge of your canvas with
black
· Mat your photograph onto some black cardstock
and adhere to the lower right hand side of your canvas, using foam tape
·
Apply some pink distress ink to a craft mat,
mist with water and then swipe your Burlap Flower FL3 01 across it so that it becomes
completely covered in pink. Once dry,
give a light swipe with black chalk
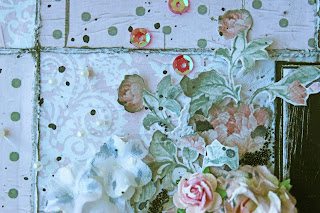
· Arrange most of your flowers (burlap, paper
& fussy cut) and metal trinket Oyster E7 069 around the left of your
photograph and also a few on the top right hand corner. Adhere using your glue gun
·
Arrange your fussy cut hinge, flowers and
remaining flowers in and around just three of the boxes of your shadow box –
use gauze as a base. Adhere using your
glue gun
·
Adhere a few randomly placed sequins and your
black microbeads around your flower clusters
·
Apply droplets of mist over your main flower
cluster
·
Adhere your title chippie on the edges of the
far right block of your shadow box


No comments:
Post a Comment