Wednesday, 7 December 2016

C90 CHRISTMAS SNOW COLLECTION
Single Page Layout – Peace on Earth
by Lisa-Marie Watling


Materials:
Fabscraps C90 002 Snowflakes
Fabscraps C90 003 Santa’s Helpers
Fabscraps C90 004 Elves Home
Fabscraps C90 005 Stockings & Bells
Fabscraps C90 006 Snow Stockings
Fabscraps C90 007 Dear Santa
Fabscraps C90 008 Santa’s Wreath
Fabscraps ST90 001 Sticker Sheet
Fabscraps DC90 003 Chippie – Peace on Earth
Fabscraps MC90 001A Carders Pack
Green & white cardstock
Gold chalk / ink
Mists – red and cranberry
Gold beads
Gold thread
Gauze
Glitter glue – gold, green, red
Tombow
Foam dots
Glossy Accents


Method

·                Cut the title strip from C90 005 so that you are left with a 12 x 12 inch sheet, red side up
·                Cut C90 004 (white side up) down to measure 11.5 x 11.5 inches.  Distress the edges and then centre and adhere to the above 12 x 12 inch sheet.  This will form  your base
·                Mist your title chippie liberally with cranberry mist, coat with glossy accents and once dry, cut from frame
·                Embellishments / elements: fussy cut a tree and some holly from C90 007 – set aside; adhere the reindeer & sleigh and holly & bells stickers from your sticker sheet to some white cardstock and then fussy cut those out; set aside; fussy cut a little snowman from a sheet from your carders pack and set aside.  These will be incorporated with your layering later
·                Cut a small narrow strip of gauze, spray with both mists and dry with your heat gun
·                With your remaining papers, start to create layering beneath your photograph, adhere some with Tombow and some with glue dots so that you get a 3D effect (refer to the photographs).  Incorporate your fussy cut embellishments / elements, gauze, green cardstock and green thread in the layering as you work.  Distress all the edges of the paper you use
·                Create a stencilled mesh background with some gold ink and a strip of Rhino tape; it should “frame” your layered work.  Apply a few flicks of cranberry mist as well, dry with a heat gun if necessary.  Once you’re happy with your layered ‘pack’, adhere it to your base page, slightly off centre, using Tombow
·                Finally, adhere your title chippie to the left of your layered ‘pack’

·                Finish your piece off by adhere some gold beads onto the gauze with Tombow and apply some glitter glue to accent the fussy cut embellishments / elements


C90 Christmas Snow Collection

Tag – A time of giving

by Lisa-Marie Watling


Materials:
Fabscraps C90 003 Santa’s Helpers
Fabscraps C90 008 Santa’s Wreath
Fabscraps ST90 002 Sticker Sheet
Fabscraps DS060 Stencil
Tag
Heavy white gesso
Brown ink / chalk
Gold thread
Red ribbon
Tombow
Foam dots


Method

·                Cover your base tag with C90 003, white side up.  Chalk the edges with brown
·                Cut a strip from the reverse of C90 003 to measure the length of your tag by 1 ¼ inches wide.  Chalk with brown and then distress the edges.  Adhere to the lower edge of your tag
·                Apply a design to your tag using your stencil and heavy white gesso.  Allow to dry completely
·                Cut a strip from C90 008 (checkered side) to measure 2 ¾ x 6.5 inches and create a pennant on both sides.  Chalk with brown and distress.  Centre and adhere to your base tag
·                Adhere one of your title stickers to a leftover piece of C90 003 (white side up) and fussy cut.  Adhere this wreath to a square cut from C90 003 (white side up), measuring 2 x 2 inches using foam dots.  Chalk and distress the edges of your square
·                Adhere this square to a piece cut from the revere side of C90 003, measuring 2.5 x 2.5 inches.  Chalk and distress the edges
·                Cut a long strand of gold thread and wind it up into a circle; place it centred on your pennant and then adhere the matted title wreath over it, using foam dots

·                Finish your tag off by tying some ribbon through the hole


Tuesday, 6 December 2016

C90 CHRISTMAS SNOW COLLECTION
Double Page LO – Dear Santa
by Lisa-Marie Watling


Materials:
Fabscraps C90 002 Snow Flakes
Fabscraps C90 003 Santa’s Helpers
Fabscraps C90 006 Snow Stockings
Fabscraps C90 007 Dear Santa
Fabscraps C90 008 Santa’s Wreaths
Fabscraps DC90 001 Chipboard Album
Fabscraps DC90 005 Dear Santa chippie
Fabscraps DS 060 Stencil
Cardstock : beige and red
Gold crackle paste
Glitter glue : red & black
Chalk : charcoal
Red ribbon
Red flower(s)
Foam dots
Tombow

Directions

·                Align two 12 x 12 inch pieces of beige cardstock and adhere to create your base
·                Cut one piece of C90 002 to measure 11.5 x 11.5 inches; and another to measure 7 x 11.5 inches – both snowman side up. Chalk with charcoal and distress.  Adhere the larger piece to the right of your base LO and align the smaller piece on the left; adhere with Tombow
·                Cut one piece of C90 006 to measure 11 x 10 inches and another to measure 6.5 x 10 inches; both should be music sheet side up.  Chalk with charcoal, distress the edges, mat onto red and then adhere them to the base you have started creating
·                Cut two strips from C90 008 to measure 12 x 3 inches (checkered side up); cut just one end into a pennant, chalk with charcoal and distress the edges
·                Cut two strips from C90 003 to measure 12 x 2.5 inches and do the same as with the above strips; centre and adhere to the above strips
·                Adhere these to the bottom portion of your LO, approximately 1.5 inches from the bottom
·                Fussy cut the large Santa, three wreaths and three additional bows from C90 007.  Chalk all the edges
·                Adhere the three wreaths to the front of your photographs to create a ‘frame’ with the wreath; overlay the additional fussy cut bows over the existing bows, using foam dots.  Adhere these three to the ‘strip’ portion of your LO using Tombow
·                Adhere the large fussy cut Santa to the far left ‘open’ portion of your LO, as can be seen in the photographs
·                Take three of the circular chippies from DC90 001 and coat them, as well as the title chippie DC90 005, with some crackle paste.  Once the title chippie has dried, coat with Glossy accents.  Once dry, adhere it with Tombow to your LO, just at the large Santa’s feet
·                Once your three large circular chippies are dry, adhere them to the front of your photographs so that they create a frame.  Brush the edges lightly with charcoal ink
·                Arrange your three large frames where you’d like them, mark their location and then use your DS060 stencil and some charcoal ink to create a ‘frame’ around each of your chippie frames.  Use the same stencil and chalk to apply some random smaller objects from the stencil around your Santa
·                Finally, adhere  your large chippie frame photographs to your final LO and add some ribbon, trimming and flower(s) to the top three loops


C90 CHRISTMAS SNOW COLLECTION

Card – Season of Joy

by Lisa-Marie Watling


Materials:
Fabscraps MC 90 001A Carders Pack
Fabscraps C90 003 Santa’s Helpers
Fabscraps C90 005 Stockings & Bells
Fabscraps C90 006 Snow Stockings
Fabscraps C90 008 Santa’s Wreath
Fabscraps ST90 001 Sticker Sheet
Fabscraps DC90 004 Chippie Season of Joy
Brown ink/chalk
Ivory & Gold embossing powder
Green & white cardstock
Green velour ribbon
Gauze
Tombow
Foam dots


Method

·                Cut your green cardstock to measure 12 x 6 inches.  Score down the middle and fold.  This will form your base card
·                Cut a 5 ¾ x 5 ¾ inch square from a sheet from your carders pack; plain side up. Chalk with brown and adhere to the centre of your base card
·                Cut four strips from C90 008, half inch wide, chalk with brown and create a border within the page above – about 1/8th of an inch in from the edges
·                Cut a strip measuring 5 x 2 ¾ from the red side of C90 005.  Scallop the bottom and top edges using a punch.  Chalk with brown and attach a strip of gauze to it before centring and adhere to your base card
·                Adhere to strips of green ribbon to this piece, as shown in the image
·                Cut your chippie from its frame – including the Santa face – and then heat emboss with your embossing powder. Adhere it to the left of your scalloped piece
·                Cut a strip from C90 006 to measure 4 x 1.5 inches (music sheet side up), cut a pennant and chalk the edges
·                Cut a strip from C90 003 to measure 1 ¼ x 3 ¼ inches (red side up), create a pennant, chalk the edges and adhere it to the pennant above.  Adhere both to the right of the scalloped piece

·                Apply the happy snowman sticker from your sticker sheet to a little white cardstock, fussy cut it out and then adhere it to the lower portion of your pennant with foam dots


C90 CHRISTMAS SNOW COLLECTION

Card – Joy to the World

by Lisa-Marie Walting


Materials:
Fabscraps MC90 001A Carders Pack
Fabscraps C90 003 Santa’s Helpers
Fabscraps C90 008 Santa’s Wreaths
Fabscraps ST90 002 Sticker Sheet
Fabscraps DS 060 Stencil
Brown Cardstock
Ink – green and brown
Mists – red and cranberry
Glitter glue – red, gold, green
Gauze
Small twig wreath
Tombow
Foam dots
Glue gun


Method

·                Cut your cardstock to measure 12 x 6 inches.  Score down the middle and fold.  This will form your base card
·                Cut a 5 ¾ x 5 ¾ inch square from one of the sheets from your carders pack; I used the sheet with the snowmen in socks.  Chalk with brown, distress the edges and then adhere to the front of your base card
·                Cut another sheet from your carders pack (plain side up) to measure 5.5 x 3.5 inches; tear the upper section; distress the remaining three untorn edges
·                Use your stencil and a blending tool to apply a design to the smaller sheet (above). Then adhere to the lower portion of your card
·                Spray your piece of gauze liberally with your two mists; arrange and adhere it to overlap the torn section of your card
·                Adhere a wreath sticker to some of the paper left over from the carders pack, per the torn piece and the fussy cut it out
·                Fussy cut a small wreath from C90 008 and chalk the edges with brown. Adhere your sticker to this wreath using foam dots
·                Cut a 2 ¼ inch circle from C90 003, distress the edges and then adhere the double wreath you’ve created above, to this circle, using Tombow.  Adhere this to the centre of your gauze, using foam dots
·                Adhere your little twig wreath just beneath your title circle wreath
·                Fussy cut some holly and a small bow from C90 008 and chalk the edges.  Arrange these around your title w wreath and also your little twig wreath

·                Finish your card off with swipes of glitter glue


Friday, 2 December 2016

C89 Sweet Baby Collection
Tags
by Ewelina Gryglak


For these tags you will need:

Vintage Prams paper C89 004
Boys Playtime paper C89 007
Stencil DS 058 C89 range
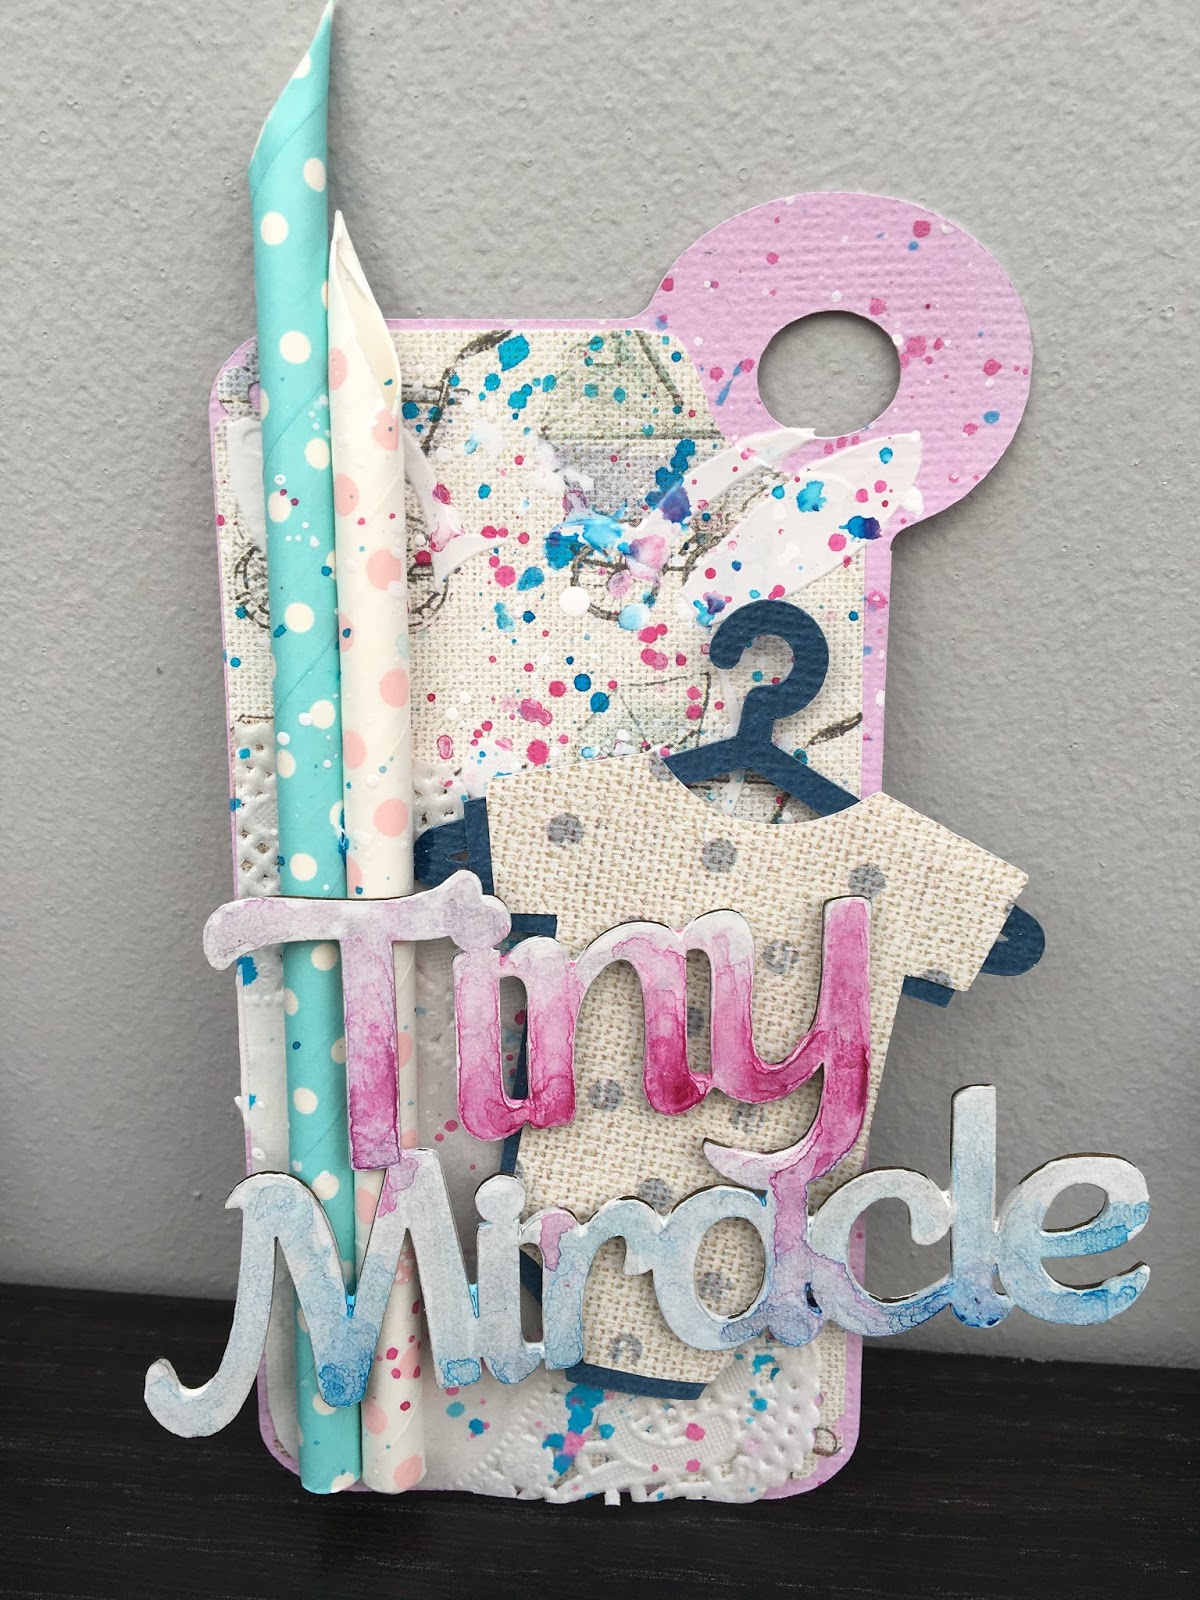
Chipboard die-cut TINY MIRACLE DC89 004
Stickers ST89 001
Other: matching colour card tags, texture paste, paper doilies, blue, pink and white ink, 3d double-sided foam tape, glue, paper straws

Instructions:

STEP 1:
Your base are lilac card tags. From Vintage Prams paper C89 004, cut out slightly smaller tags that you will glue onto the base tags. I traced the original tag on the paper and then cut it 2mm from the inside line. This is your first layer.

STEP 2:
Using Stencil DS 058 C89 range and texture paste (you can mix it with the pink ink to add colour), make a ‘stamp’ on the background.

STEP 3:
In the bottom corner of each tag, glue a piece of a paper doily. Sprinkle blue, white and pink ink all over the tags to add colour and texture. Leave to dry.

STEP 4:
Colour the Chipboard die-cut TINY MIRACLE DC89 004 to match your colour theme (I used white ink to make it stand out and then ‘watercoloured’ it with blue and ink paint). Leave it to dry.

STEP 4:
From the Sticker sheet ST89 001, glue both prams on white card and fuzzy cut.
From blue card, cut a hanger and from Boys Playtime paper C89 007 cut a baby grow and assemble together.

STEP 5:
TAG1:
Using 3d foam tape, attach blue pram and glue on 2 blue paper straws.
TAG2:
Using 3d foam tape, attach pink pram and glue on 2 pink paper straws.
TAG3:

Using 3d foam tape, attach the baby grow and glue on one pink and one blue straw. On top glue the TINY MIRACLE chipboard.


Thursday, 1 December 2016

C90 Christmas Snow Collection 
Card 
by Bev Code


I love this origami xmas tree. I make them every year. They are an amazing homemade accent using any paper collection your using this season. I used C90 Christmas Snow Collection from Fab Scraps to create this super cute card. I will share the instructions too so you can make one too. Be sure to visit the Blog where you can view lots of amazing projects using Fab Scraps Collections.

FOR THIS CARD YOU WILL NEED:
Supply List:
Collection: C90 Christmas Snow Collection
Other: metal xmas treed, ink, lace, Robin's Nest dew drops, glitter CS, beads 

INSTRUCTIONS:
STEP #1: For this card pull papers for your background card base. Then pull all the same or accenting papers to make your origami xmas tree. 

STEP #2: Follow the instructions to making the origami xmas tree… using info below.

STEP #3. Put your tree together. Put your card together... anything goes.

STEP #4: Finish your card by decorating the tree, add the sentiment and anything else to complete your card. I added the lace on the bottom.

Origami Christmas trees can be a great accent on cards… but also on layouts and other fun creative projects.
Thanks for joining me today.