Thursday, 9 March 2017

C92 WOODLANDS FRIENDS COLLECTION
Tag – Best Friends
by LISA-MARIE WATLING


Materials:

Fabscraps Medium Blue Cardstock
Fabscraps C92 003 Sprinkles
Fabscraps C92 005 Merry Weather
Fabscraps C92 008 Fairy Dust
Fabscraps ST92 001 Sticker Sheet
Fabscraps ST92 002 Sticker Sheet
Fabscraps MC92 001A Carders Pack
Pale mauve cardstock
Mauve chalk
Glitter glue : blue, pink, white and green
Gauze
Foam dots
Double sided tape
Tombow
Ribbon


Method

·                From your Fabscraps cardstock, cut a tag measuring 4 x 8 inches; punch a hole in the upper section
·                Cut a piece of mauve cardstock down to measure 3 ¾ x 7 ¾ inches and match the upper end of your tag; distress the edges and adhere it to your base tag
·                Cut C92 008 (mauve side up) to measure 3.5 x 7.5 inches and match the upper end of your tag; chalk with mauve and distress the edges; adhere to your base tag
·                Select one of the tags from your carders pack (plain side up); distress the edges and then adhere it to C92 005 (trees side up); fussy cut around the edges and then adhere to the left hand portion of your tag
·                Adhere the ‘best friends’ sticker from ST92 002 to a discarded piece of paper from your carders pack (plain side up); fussy cut it out.  Adhere this to a piece of mauve cardstock and fussy cut it out.  Adhere this to a piece of leftover blue cardstock and fussy cut it out.  Finally, adhere this to a piece of paper from your carders pack – I selected the piece with the single peach tree; fussy cut out.  Set aside
·                Adhere the row of birds from your ST92 001 sticker sheet to a piece of paper from your carders pack (plain side up).  Cut it out and round of both short edges (as shown).  Adhere this to a strip from C92 003 (teal side up) and fussy cut out to; adhere a double layer of gauze to the back of this, using double sided tape
·                Adhere your row of birds piece to the lower right hand portion of your tag, so that it overlaps the adhered die cut tag
·                Adhere your ‘best friends’ sticker creation to the far left of your die cut tag (it will overlap the row of birds slightly) using foam dots

·                To finish – highlight some of the birds and features with corresponding coloured glitter glue.  Thread some ribbon through the tag hole


C92 Woodlands Friends Collection
 You are so tweet
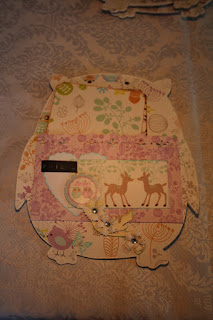
Mini Owl Booklet
By Kim Herbst


Front Cover
Cover with C92 003. Cut out the eyes and the bottom row feathers.  On the right hand side. Glue the following down starting from the top. The mushroom and deer ephemera. Then the inked frame of the title and white cotton twine. Let some of the twine lay down towards the bottom. On top of the frame add the pink vellum 3” x4 ¼”.add the inked title C92 003 to the right of the frame. With a fussy cut bird on top. Then add flowers to decorate. See photo for placement.

Page 1 (inside cover)
Cover with C92 002
Cut 5 ½” x 2 ½” from C92 005. Place this bottom right.
Cut 4 ¾” x 3 ½” ink edges and place 1 ¼” up from the C92 005.
Add the squirrel DC 92 011 inked, on the left. And a small one on the bottom right.
Add a swirl chippie with three punched flowers on the right of the squirrel. Three blue bling at the bottom and left edge.
Punch three butterflies from left over paper and glue on the top right with pearls,


Page 2
Cover with C92 002
Cut photo frame 5 ¾” x 3 ¾”. Place 1 ½” from the bottom. Add flowers and punched flowers and bling under this.
Mat “best friend” tag with black cardstock and place onto the left, with one punched butterfly.


Page3
Cover with C92 001.
Add white cardstock photo mat. 5 ¾” x 4 ¼”. Add doily under the top section of the phot mat with a few flower, pearls and butterfly.  At the bottom add a bird ephemera on the right, small white flower and inked cuteness DC92 006.


Page 4
Cover with C92 001.
Make a pocket holder from C92 008. 7” x 4 ½” score ½” on three sides. Deco punch the top edge adding pearl bling. Place on bottom section adding punched butterfly, small swirl with punched flowers with bling in center. Punch out a heart, 2” x 4” from C92 005, dymo punched “friend” in black. Besties sticker. Refer photo for placement.  Cut two tags 4” x 5 ½”. One from C92 002, another from C92 008. Corner punch the edges.


Page 5 and Page 6

Cut strips from C92 003. And C92 002. Cover the background with the strips.

C92 Woodlands Friends
Best Friends
By Kim Herbst


What you will need:

C92 004 x 2
C92 007
C92 005
DC 063 stencil
DC 010 2 X Bambi
Modeling paste
Gel medium
Small glass stones in clear and silver.
Leaf die cut
Blue and white flowers
DC 92 007
Best friend title
White card stock
Green ribbon
Bling


Instructions

For your background, use C92 004. Cut the bottom strips off and temporary join in the middle.

On the left side, using modeling paste, stencil the tree about one inch from left edge. When the paste is dry, lay the stencil over the modeling paste, ink the leaves and bark in browns and green.  I add a little green glitter on the leaves. 

Fussy cut some deer’s from C92 005, add under the tree. I fussy cut five. At the bottom of the page I added gel medium with a bit of blue ink to resemble water. Before this dried I added clear and silver stones. Also a small blue rose.

After inking the bambi’s, I added them just above the “water line”. C92 007 was place 7” from the left and ½” from the bottom. Added a 2 ¼” x 12” tag, 2” from the C92 007 edge. Place white card stock, 12” x 8”, 1 ½” from the left of C92 007.  Decorate and add the DC 92 007 owls on branch on the bottom right, just under the white cardstock.  Place a 6 ½” x4 ½” C92 005 on the top left 1 ¼” from edge. On top of that 6 ¼” x 4 ¼” of white cardstock.

From the C92 005 cut the following, the row with the blue and silver mushrooms. This is placed above the main white cardstock, add pearl bling. The birds and flower row. This is at the bottom of the page. 
C92 Woodlands Friends Collection
Layout
by Kavitha


Supplies list:

Card makers pack- MC92 001A
Fabscraps stickers- ST92 001

Instructions:

1.Take white cardstock measuring 5 ½ by 11 inches and score at 5 ½ inches

2.Take turquoise card stock measuring 5 3/8 by 5 3/8 inches.

3.Take a pattern paper from the card makers pack measuring 5 ¼ by 5 ¼ inches

4.Distress the die cuts with vintage photo distress inks

5.Add the die cuts and stickers to finish off the card.


C92 Woodlands Friends Collection
Tag

by Kavitha


Supplies list:

Card makers pack- MC92 001A
Sticker- ST92 001
Die cuts, buttons, white and colour cardstock

Instructions:

1.  Take white card stock measuring 3 by 6 inches.

2.  Take pattern papers from card kit,mat them with color cardstock and glue it to the tag.

3.  Die cut the flowers with pattern paper,add button to the center.

4.  Die cut butterfly and leaves from pattern paper

5.  Glue down everything together and finish it off wit ha sticker.


Friday, 3 March 2017

GUEST DESIGNER!
JOSEFINE FOURAGE

Josefine, our guest designer, created a beautiful African canvas using our C91 Call from the Wild Collection.  See below how she created this gorgeous canvas.

Hi everyone. My name is Josefine (aka HolyLise) and I’m thrilled to be guest designing for FabScraps today! FabScraps is my favorite brand for chipboard die cuts and paper for mixed media projects. I can’t even begin to tell you how much this opportunity means to me :D

But before I get all sentimental, here is the canvas that I created using the new Call from the Wild Collection.


I started by cutting the front page from the chipboard album into shape and adhered strips of the call of the wild paper on top. After the gel medium dried, I traced the Africa shape with my craft knife to get rid of all the access paper.


Then I gessoed it, so the colors were a little more muted and added some animal shapes with the Wild Animals stencil.


The paper has some really pretty animal photography on it, so I decided to cut some of the shapes out and adhere them to the continent. Now I painted over it with several shades of green and blue acrylic paint as well as some gold shimmering ink. I ended up adding two layers of paint, plus another layer of gesso.


While I was waiting for everything to dry, I separated the two trees from their frame. Now I colored that frame and the word “Africa” in dark blue and added some gold sparkle on top. I wanted the bigger tree to stand out from the background, so I gessoed it first and sprayed two shades of green ink on it afterwards.


For the canvas, I used black paint and added white spritzer on top in the hopes that it looks like a night sky. I sure hope that I was successful with it.


At the end I adhered the Africa shape to the canvas. Then I glued the frame, tree and the word die cut on top of it and finished everything up with some flowers.


I hope you enjoyed my guest project for FabScraps. I sure had a lot of fun creating this canvas and it will have a special place in my craft room.

Supplies Used
All the products used are from the Call from the Wild Collection C91