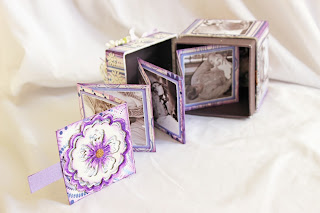
PHOTO BOX
Materials:
Fabscraps C83 002 Zig Zag
Fabscraps C83 001 Cosmic Fantasy
Fabscraps C83 Carders Pack
Fabscraps Chippie DC83 012 Flower
Fabscraps Chippie DC83 010 Hot Air Balloons
Fabscraps Stencil DS 045 Daisy
Cardstock – dark purple, mauve, lilac
Thin cork
Chalks – grape and frosted lilac
Pearlised mist
White acrylic paint
Deep purple water colour pencil
Deep purple good quality pencil
Black and Silver pens
Selection of paper flowers – white, ivory, purple, lilac, mauve,
blue
White satin leaves
Miniature Styrofoam birds – purple and blue
Microbeads – purple and gold
Glass glitter – silver
Gold glitter
Silver butterfly charm, or similar
Purple cord or narrow ribbon
White UTEE or embossing powder
Heavy white gesso
Glossy accents
Glue gun
Tombow
Multi matte medium
Chippies
·
Select one of the hot air
balloons and cut it from the frame.
Using your UTEE or embossing powder – heat emboss both sides. Take your time with this to ensure good
coverage. Set aside for later
·
Paint your flower chippie with
at least 3 coats of white acrylic paint.
Use your purple water colour pencil to gently ‘shade’ the central and
outer petals of the flower; dry with a heat gun if necessary. Use your purple pencil to lightly shade
around the inner petals. Use more
white acrylic paint to create fine white lines over your purple water colour
pencil painting; as show in the close up images. Put a fairly generous dot of Tombow in the centre of your
flower and when it has gone tacky, sprinkle with gold microbeads and also with
gold glitter. Once this has dried,
coat your entire flower with glossy accents and set aside to dry for later
Photo concertina
·
Measure the inner portion
of your box and cut two strips
from C83 002 to fit – make your cut about ¼ inch narrower than your box
measurement so that it does not fit too snugly. Score your strips at 3 inch intervals and fold into a
concertina
·
Use a strip of cardstock to
adhere the two strips together end to end and adhere with Tombow
·
Chalk / ink all the edges of
each folded square with dark purple and then also draw rough ‘frames’ around
the edges using your black pen
·
Decide where you want the top
and the bottom of your concertina to be and then lay it out in front of
you. The very last block at the
end is going to be embellished with your selection of flowers, one bird and
microbeads, so should be left open; as well as the block directly above it AND
the uppermost block. On the
reverse, you need to leave open the last two blocks too.
·
Adhere your photographs (except
the topmost three) to your cardstock and chalk the edges with purple and lilac;
then adhere your photographs to your concertina
·
Proceed to embellish the block
as mentioned above, using your selection of flowers, etc; . Swipe on little dabs of heavy gesso and
then mist with pearlised mist and allow to dry
·
Cut one small strip from your
selected page from the carders pack that is the width of one square, but
approximately 1 inch in height; score down the centre
·
Cut another strip from that
page of carders pack that measures the width of you square, but DOUBLE in
height. Score down the centre and
make a small slit just in the middle of that score
·
Adhere the smaller cut strip
above to your uppermost square, ensuring that the score line is level with the
top of your concertina; this is going to be your last ‘hinge’
·
Cut a strip of cardstock –
approximately 1 inch in width and 4 inches in length – and gently feed it
through the slit you made in the longer piece of carders pack paper. Fold the cardstock piece in half and
adhere the sides together
·
Then, fold the larger piece of
carders pack paper in half and adhere it to the smaller strip, so that the
smaller strip is tucked between the two folded ends
·
Adhere your painted flower
chippie to the uppermost block (facing up) and adhere your remaining matted
photographs – all using Tombow
Outer Box
·
Measure the sides of your box
(keep it closed, it makes life easier!) and cut squares from C83 001 so
that they will slightly overlap the edges. Adhere these using multi matte medium and allow to dry completely,
before you sand off the edges.
Once that is done, you can use your craft knife to cut the “slit” where
the box lids meets the base. It
really is worth it to wait for the paper to be properly dry before sanding and
cutting, as it can tear
·
Cover all the sides and the top
of your box this way
·
Measure, cut and adhere a piece
of thin cork and adhere this to the bottom of your box, also using multi matte
medium
·
Give the sides and the top of
your box a thin coat of multi matte medium to ensure that all the paper is
securely adhered down and protected
·
Use your DS 045 Daisy stencil
to apply some of the smaller flowers to the sides of the lid of your box, with
heavy white gesso. Once this has dried, outline your daisies with black pen
·
Adhere your remaining
photographs to the sides of your box and draw a rough frame around them (onto
the cardstock) with silver pen
·
Embellish the lid of your box
with your remaining flowers, satin leaves, bird, cord/ribbon and charm; use
your glue gun to adhere these.
Adhere your hot air balloon chippie to the flowers so that it sits
upright on your box
·
Finish off with glass glitter
and swipes of heavy white gesso


No comments:
Post a Comment