Thursday, 30 July 2015

C76 Country Living Collection | Tutorial by Tanya Cloete


C76 COUNTRY COLLECTION
Chopping Board – Food for Thought
-Tanya Cloete-

For This Layout You Will Need:

·      FabScraps Country Kitchen Collection paper range : C76 003 & C75 008
·      Chipboard Pieces : DC76 006 & DC76 013            
·      Sticker ST76 001
·      Black & Beige Cardstock
·      Chipboard and Cork
·      Wooden Chopping Board and Rolling Pin
·      Beige and Brown Acrylic Paint
·      Foam Squares
·      Silhouette Cameo
·      Tim Holtz Apothecary Bottles DIE
·      Tim Holtz Distress Ink Gathered Twigs, Mustard Seed and Fired Brick
·      Metal Embellishments, Trims and Lace

Instructions:

1.     Silhouette Cameo :
·      Cut a lady silhouette carrying a pie from black cardstock and the internal offset from sheet 008 (only the dress and shoes) and ink the edges with gathered twigs.
2.     Cut sheet 003 to fit the wooden chopping board and ink the edges with gathered twigs and adhere.
3.     Cut one apothecary bottle from the Tim Holtz Die from chipboard and the lid from cork.  Ink the bottle with fired brick and mustard seed. Matt the sticker (Happiness is Homemade) onto beige cardstock. Adhere to the bottle with foam squares as per the picture
4.     Ink chipboard piece 006 with fired brick and mustard seed.
5.     Paint the rolling pin and chipboard piece 013 with beige paint and dry brush with brown paint.  Add sticker (SAVOUR) from sticker ST001 once dry.
6.     Arrange the rest of the embellishments as per the picture and glue!
7.     All Done! Ready to hang!


C75 Tranquility Collection | Tutorial by Tanya Cloete


C75 TRANQUILITY COLLECTION
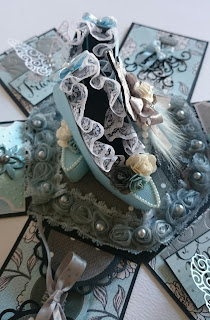
Exploding HEX Box
-Tanya Cloete-

For This Layout You Will Need:

·      FabScraps Tranquility Collection paper range : C75 002, C75 005 & C75 008
·      Chipboard Pieces : DC75 010            
·      Journal DIE Cuts MC 75 001A
·      Sticker ST75 002
·      Black/Grey/White & Light Blue Cardstock
·      Metallic Silver and Light Blue Paper
·      Chipboard
·      Silhouette Cameo
·      Tim Holtz Sewing Room DIE
·      Memory Box Swirl Butterfly DIE
·      Spellbinders Lacey Ovals DIE
·      Tattered Lace Mannequin DIE
·      Cuttlebug Embossing Folders Swiss Dots & D’vine Swirl
·      Lindy’s Stamp Gang Desert Moon Turquoise
·      Tim Holtz Distress Stain Black Soot
·      Glossy Accents
·      Micro Beads Wave
·      Metal Embellishments, Flowers, Trims and Lace

Instructions:

1.     Silhouette Cameo :
·      Cut the box and lid from black cardstock.
·      Cut 2 lady silhouette forms from black cardstock.
·      Cut 2 pocket envelopes from grey cardstock.  Emboss with the D’vine Swirl.
·      Cut 2 folder inserts from white cardstock and the internal offset from the metallic silver & light blue paper. Emboss with the Swiss Dots.
·      Cut 2 stilettos from the light blue cardstock and the inner section from black cardstock.  Build the shoes as per the instructions from Silhouette.  Add the flowers, ribbons and trims as per the picture.
·      Cut 12 squares and one hex shape (for the lid) from sheet 002 to fit onto the box (inner and outer).
·      Cut another hex shape from sheet 008 for the inside of the box.
2.     DIES
1)Tim Holtz Sewing Room DIE
Cut one mannequin from chipboard and stain with black soot on the sides. 
Cut 2 more mannequins from sheets 005 and adhere to the chipboard
mannequin (back and front).  Add the flowers, ribbons and trims as per the picture.
2) Memory Box Swirl Butterfly DIE
Cut 2 butterflies. One from white cardstock and the other from metallic light blue paper.  Add rhinestones as per the picture.
3) Spellbinders Lacey Oval DIE
Cut one lacey oval from black cardstock and cut in half.  Cut an oval shape from sheet 008 and cut in half and adhere to the lacey oval as per the picture. Add the sticker (Natural Beauty) from sticker ST002.
4) Tattered Lace Mannequin DIE
Cut the mannequin from black cardstock and add glossy accents.  Add some micro beads as per the picture. Leave to dry.
3.     Emboss chipboard pieces DC 75 010 with desert moon turquoise.
4.     Cut the words in blue (Peaceful/Cherish/Tranquil/Relaxing) from the Journal Pack 001A and matt with black cardstock.
5.     Arrange the rest of the embellishments as per the picture and glue!
6.     All Done! 


Tuesday, 14 July 2015

Tutorial by Ada Nicholls | C75 Tranquility Collection


Inspiring Thoughts
DT Member: Ada Nicholls
Collection: C75 Tranquility 


Requirements:
Photos: 3 x 4 x 4” (10 x 10 cm)
Paper: Plain: 2 x plain black cardstock, 1 x plain green cardstock.
Pattern paper (Fab Scrap Tranquility range):  2 x C75 005 (French rulers), 1 x C75 008 (french gray) and 1 x C75 008(French gray - the dots).
Chipboard: 1 x Title “ Inspiring thoughts” ( DC75 004), 1 x frame (DC 75 014) and 1 x flower frame.
Postage stamp words ST75 001
Circular words ST75 002 
Extras: Flowers, flat backed pearls, green spray mist, black and green rhinestones

Instructions:
Paint all the chipboard black. (you can change the colour to suit your preference).

Create the pages:
Left page:

1.     Use black as the background page.
2.    Use one C75 005 pattern sheet (french rulers) and cut it to 11 ¾ x 11 ½” (30 x 29 cm).
3.    Stick on the page right against the right edge.
4.    Use the C75 008 (grey dots) pattern sheet and cut a piece 9 ¼ x 5 ¾” (23.5 x 14.5 cm).
5.    Matt this on plain grey ( 9 ½ x 6” – 24 x 15 cm) and stick it right against the right edge about 3 ¼” (8 cm) from the top edge. 
6.    Use 2 x 4 x 4” (10 x 10 cm) and matt these on green (4 ¼ x 4 ¼” – 10.5 x 10.5 cm).
7.    Stick the photos on the grey dots.
8.    Add the chipboard – refer to the picture for placement.
9.    Add flowers – refer to the picture for placement.
10.  Add the flourish die cut  MC 75 001A.

Right page:

1.     Use black as the background page.
2.    Use one C75 005 pattern sheet (french rulers) and cut it to 11 ¾ x 11 ½” (30 x 29 cm).
3.    Stick on the page right against the left edge.
4.    Use the pattren sheet C75 008 (french grey) and cut a piece 5 ¾ x 10 ¾” (15 x 27.4cm). Use green spray mist and spray all over the paper – allo drying.
5.    Matt this on plain grey cardstock – 6 x 11” – 15.5 x 27.9 cm.
6.    Stick on the page against the left edge and making sure it is centered.
7.    Use the pattern sheet C75 008 (french grey dots) and cut a piece 4 ¾ x 5 ¾” ( 12 x 14.5cm). Matt this piec on plain grey cardstock – 5 x 6” (12.5 x 15 cm).
8.    Stick on the page next to the stripes on the page and 3 ¼” (8cm) from the top edge.
9.    Use a journal die cut sheet (MC75 001 A) 4 x 8” ( 10.5 x 20.3 cm) and matt it on black 4 ¼ x 8 ¼” (11 x 20.8 cm). Stick this on the green  making sure it is centered.
10.  Use the template for the doll and make it.
11.   Stick the floral frame and stick on the die cut. Add the die cut bottles (MC75 001A).
12.  Add the postage words (ST75 001)
13.  Use a 4 x 4” (10 x 10 cm) photo and matt it on green. 4 ¼ x 4 ¼” (10.5 x10.5 cm).
14.  Add the flowers.

                                  ***********************


Wednesday, 1 July 2015

Tutorial by Ada Nicholls | C75 Tranquility Collection


Good for the soul
Designed for Fab Scraps by Ada Nicholls

Requirements for the project:
Photos: 2 x 4 x 6” (10 x 15 cm) portrait and 1 x 3 ¼ x 5 ½” (8.4 x 13.7 cm)
Paper: Fab scraps C75 Tranquility collection.
( 2 x C75-006 french lace (damask pattern), 2 x C75-006 french lace (reverse circles), 1 x C75 – 007 Sewwing patterns (reverse grey), 2 x plain turquoise cardstock and 3 x plain black cardstock.
Embellishments: Chipboard title “Good for the soul”, (DC-007), chipboard Flower filigree (DC75 – 008) and Filligree (DC75-009) a metal angle charm flowers and the stencil (DS036) jungle flower. Texture paste, silver glitter, turquoise glimmer spray and grey chalk or paint.

Create the pages:

Left page:

1.     Use plain black cardstock as the background page.
2.     Use sheet C75 – 006 French lace (damask side) and cut it to 11 ¾ x 11 ½” ( 29.7 x 29.1 cm).
3.     Stick on the background page right against the right edge.
4.     Use the turquoise cardstock and cut a piece 10 ½ x 10 ½” (27 x 27cm).
5.     Use C75 – 007 Sewing patterns BUT the reverse side grey and cut a piece 2 x 10 “ (5 cx 25.5cm) and border punch the one long edge.
6.     Stick on the page at the bottom.
7.     Stick turquoise on the page in the centre.
8.     Use sheet C75 – french lace BUT use the reverse of this and cut a piece 10 x 10” (26.3 x 29.3 cm). Stick on the turquoise and make sure it is centered.
9.     Use the stencil and texture paste and mask on the page anywhere you would like. Allow drying for about 10 minutes then spray over the masking. Allow drying.
10.  Matt 1 x 4 x 6” (10 x 15 cm) ohoto on black. Stick on the page about 2 ½” (6.3 cm)  from the left edge and 2 ¼”( 5.5cm) from the bottom edge.
11.   Stick another photo next to this one.
12.  Use chipboard and paint or chalk. Use glitter and paste all over the chipboard.
13.  Stick on the page –refer the picture for placement.
14.  Add the rest of the embellishments.

Right page:

1.     Use plain black cardstock as the background page.
2.     Use sheet C75 – 006 French lace (damask side) and cut it to 11 ¾ x 11 ½” ( 29.7 x 29.1 cm).
3.     Stick on the background page right against the left edge.
4.     Use the turquoise cardstock and cut a piece 10 ½ x 10 ½” (27 x 27cm).
5.     Use C75 – 007 Sewing patterns BUT the reverse side grey and cut a piece 2 x 10 “ (5 cx 25.5cm) and border punch the one long edge.
6.     Stick on the page at the bottom.
7.     Stick turquoise on the page in the centre.
8.     Use sheet C75 – french lace BUT use the reverse of this and cut a piece 10 x 10” (26.3 x 29.3 cm). Stick on the turquoise and make sure it is centered.
9.     Use the stencil and texture paste and mask on the page anywhere you would like. Allow drying for about 10 minutes then spray over the masking. Allow drying.
10.  Use photo and matt on plain black cardstock. Stick on the page towards the left making sure it is in line with the previous page.
11.   Paint chipboard as before.
12.  Add embelishments as shown on the picture.