Thursday, 4 August 2016

C87 JOURNEY IN TIME COLLECTION  - by Michelle Frisby
Journey is the reward 


For This Project You Will Need

•   FabScraps  Carder’s Pack – MC87 001A
•   FabScraps Stickers – ST87 001
•   FabScraps Stencil DS 054
•   FabScraps metal adornments
•   Muslin [cheesecloth], flower, gesso, corrugated cardboard, stencil, modelling paste, tag, string, peg, brown ink, easel board, sentiments, paintbrush

Instructions
1.              Use a small easel board as the base for your project.
2.            Cut the bottom ornate edge off one of the label shapes in the carder’s pack MC87 001A. Ink edges and adhere to the top of the label shape for extra strength.
3.            Adhere a piece of corrugated cardboard to your easel board and then adhere your label shape on top of it.
4.            Using the stencil and modelling paste – apply modelling paste to the word ‘Paris’.
5.             Select a sticker from ST87 001 and adhere to the top right hand side corner.
6.            Adhere a selection of the aeroplane shapes from the Carder’s pack MC87 001A to make them sturdier.
7.             Adhere to the left hand side of your panel, not layer embellishments, metal adornment, tag and string.
8.            Cut out ticket ephemera and adhere to small tag, adhere flower and sentiment and you are done, well one side of your easel board.
9.            Turn your easel board around and start the process on the reverse side.
10.        Adhere sticker to bottom left hand side of the label, adhere and layer ephemera, add a metal and a peg.
11.          Randomly apply some white gesso with a paintbrush.

12.        All done.


C88 FLORAL DREAMS COLLECTION - 
By Taryn Johnson


For this layout you will need: 
Photos:  3 x 5x7 (13 x 18cm)
Paper: Background paper – 2 x black cardstock
Patterned paper – cut STARLIGHT C88 004 11” X 11” (28 x 28 cm)
Chipboard – LIFE IS GOOD DC85 003, DC85 011 including the frame , paint black or use a distress crayon.

Embellishments: I fussy cut lots of flowers from the SPRINKLES C88 003 and STARLIGHT C88 004 , you need enough to cover the entire top of the photos, sliding the flowers underneath .
I used strips of left over paper to create the boarder at the bottom , fold and stick under photos.

Matting:  When matting add ¼” extra on each colour you matt with ie: photo size 4 x 6 (10 x 15 cm) – matting 4 ¼ x 6 ¼”(10.5 x15.5 cm) and so on.


Cutting instructions:

             Colour                                        Size

1.      Black cardstock                 2 x background
2.      STARLIGHT C88 004         2 X Sheet on the small protea side 11” x 11” (28 x 28cm)
3.      Black cardstock                 1 x Sheet cut in half and trimmed to 11” (28 x 15cm)
4.      STARLIGHT C88 004          12 X Strips

Instructions:

1.      Black card stock as background for this double layout
2.      STARLIGHT C88 004 for the next layer.
3.      Black cardstock placed 3” from the top .
4.      Place distressed edged photos next to each other.
5.      Embellish with the chipboard as shown.
6.      Add proteas that you fussy cut across the top .
7.      Add strips , 4 per photo at the bottom – folding and sticking underneath.


This layout is a fathers day tribute to my brother in law.
C88 FLORAL DREAMS COLLECTION - 
by Jeanine de Bruyn

MAGICAL MOMENTS LAYOUT


A single page layout using the Fabscraps C88 range
Requirements:
2 Sheets of C88 007 Blossom
1 Sheet of C88 008 Fairy Dust
1 Chipboard title C88 005 (Magic Moments)
Green cardstock
Black cardstock
Texture paste and stencil of your choice (optional)
White and Grey paint (optional)
Flat back pearls
Lace/Cheesecloth/gauze
Flower and embellishments of your choice
(I made my own flower using fabric)

Directions:
Your background paper  will be the C88 007 (Blossom) paper, Using your texture paste and a stencil add randomly to your background paper, I also stamped over the texture paste once it was dry just so that it wasn’t so white.
Fussy cut the Fairy from the bottom left of the C88 007 paper.
Fussy cut the flower ‘border’ on the left side of the C88 008 paper, also cut out the round ‘frame’.
Cut a piece of measuring 16.5cm across and 21cm down from the remaining piece of C88 008 paper, distress and chalk the edges before matting it on a piece of green cardstock.
Matt your photo first on black cardstock then onto a piece of the C88 008 paper, then onto green cardstock remembering to distress and chalk all the edges. I then added foam to the back to lift the photo slightly from my page. Before I glued it down onto my 16.5 x 21cm piece I added a little cheese cloth to the left side of the photo.
Fussy some flowers from the remaining pieces of both papers.

To Assemble the page: 
Begin by glueing down your flower border to the left side of your background paper ( I added foam squares behind my flowers to lift them a bit, as well as some gauze behind the flowers for a bit of texture).
I glued a piece of wide lace (which I cut from an old kitchen curtain) to the right side of my page, you don’t really see much of it but I just liked the softness that it added to the page.
Next glue down the 16.5 x 21cm piece. To the top right of the piece add your frame, flower ( I made my own using another part of the kitchen curtain) and your cut out flowers. I also stamped some butterflys onto vellum and embossed them then fussy cut them out. I added a white frame from my stash behind my flower and one of my butterflys in the middle of the frame. On the bottom right of the page I added my fairy and some more of the cut out flowers as well as another smaller white frame from my stash and another stamped butterfly.
Add the title to the bottom left of the page and then just have fun embellishing your page further. I added some stickels to my flower as well as some flat back pearls here and there.
Lastly I splattered some white and grey paint over my page ( remember to cover your photo first). Happy scrapping everyone!.


C88 Floral Dreams Collection Double Diamond Card by Bev Code


FOR THIS CARD YOU WILL NEED:
Paper: C88 Floral Dreams Collection 003 Sprinkles, 004 Starlight. 
C87 Journal in Time 008 Travelogue
Chipboard: DC88 006 Make a Wish
Accent: ST88 001 Fairy Princess Vinyl Stickers
Other: Copic markers, Cardstock, SRM Sticker stitches,


INSTRUCTIONS:
STEP 1: Following the pattern instruction sheet below from Castlepark Designs make your card base out of cardstock.


STEP 2: Trim and fold as per instruction sheet above.


STEP 3: Using a paper collection you have so many options to decorate the folded spaces. You can make the pieces an exact fit or do like I do and make them 1/8” smaller on all side to leave a border accent. I love the pop of colour prints with a white cardstock background. (tip – trace a 2nd base and cut these pieces apart and use them to trace the pieces – some pieces are the same identical size just flip them around to fit the space – keep these tracer pieces in an envelope stapled to the pattern sheet for re –using over and over again). The centre one is easier so just mark the paper and cut it.


STEP 4: Using the stencils you made trace and cut the pieces to fit all sections.


STEP 5: Glue the pieces especially careful to get to the edges of each.


STEP 6: This photo shows how your card will stand up.


STEP 7: I copic coloured the chipboard and then matted it with a piece of paper to make it pop. I added some of the vinyl sticker accents to finish the card.


C85 SHABBY ROSE COLLECTION - BY EWELINA GRYGLAK 
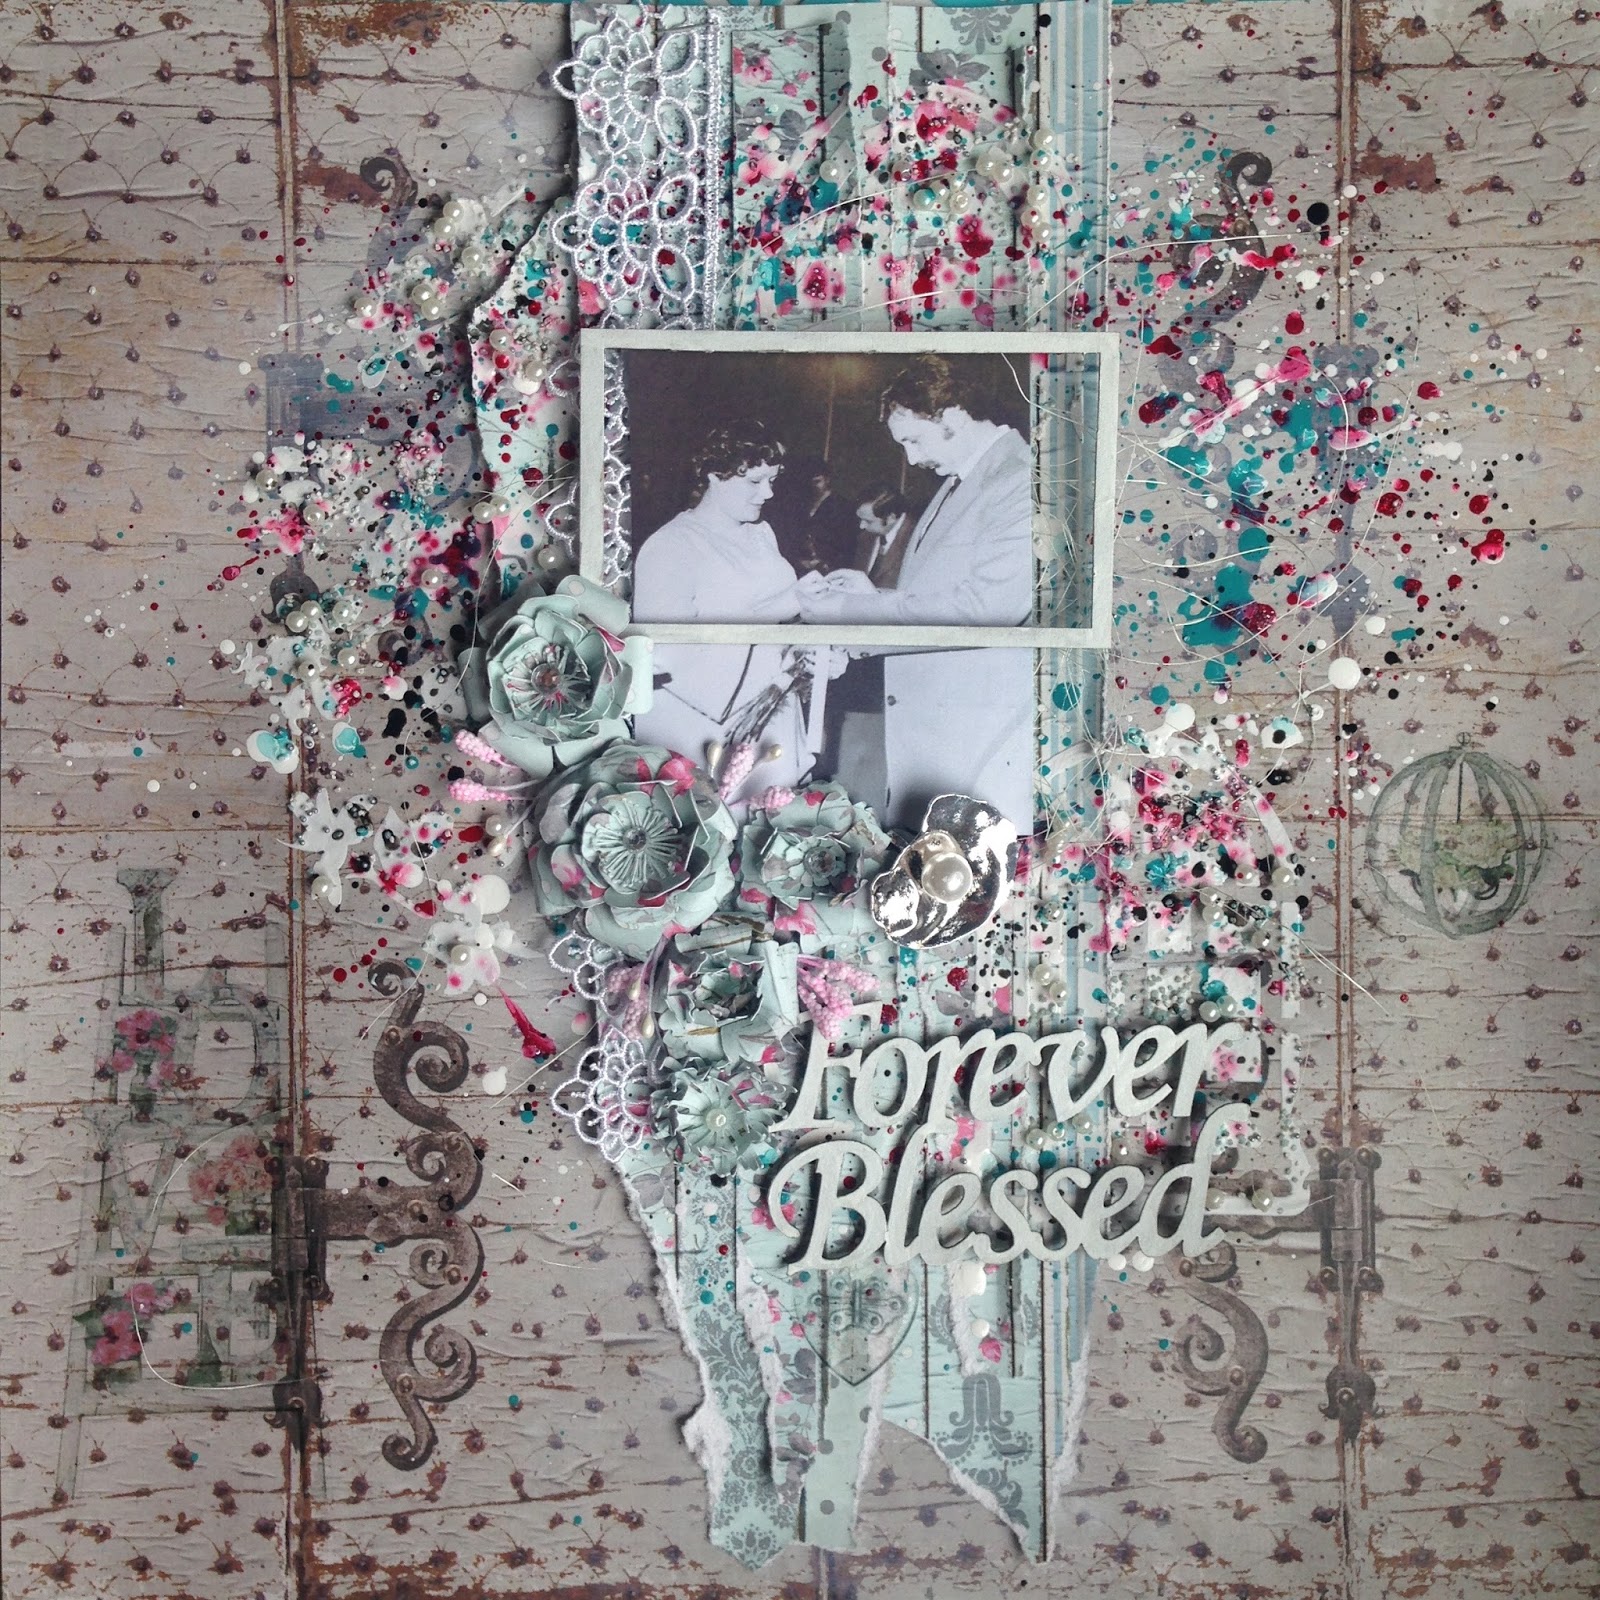
12x12 scrap page ‘Forever blessed’


For this layout you will need:

Vintage Panels paper C85 006 x2
Chipboard die-cut FOREVER BLESSED DC85 004
Stencil DS 049 C85 range
Stickers ST85 001
Silver embellishment – oyster shell E7 069
Flowers: Fresh Vintage paper C85 005
Other requirements:  clear matte gesso, white gesso, texture paste, teal, pink, black and white acrylic inks, floral bristle, floral twigs, lace, white grit, silver micro-beads, pearl beads, double-sided tape, glue

Instructions:

STEP 1:
Your base page is Vintage Panels paper C85 006, using the wooden door side. To make sure the wet mediums don’t soak through the page, prime it with a layer of clear matte gesso (that will make it waterproof but will not fade out the original paper design).

STEP 2:
Tear the other sheet of Vintage Panels paper C85 006 into vertical strips but make them uneven in thickness and length – you want them to look like peeling off wallpaper. You can distress the edges and fold the strips length-wise to add dimension.
Glue them in layers in the centre of the page running from the top of the page – this is the centre piece of your page. Leave to dry.

STEP 3:
Using the Stencil Stencil DS 049 C85 range range and texture paste, add window stamps to the page – they can be partly on the vertical strips, partly on the background. Make sure they’re on both sides of the cluster.

STEP 4:
Sprinkle pink, white, teal and black acrylic inks across and around the paper cluster. Leave to dry.

STEP 5:
While the page with the wet mediums is drying, make your paper flowers. I make mine using Silhouette cut files and Fresh Vintage paper C85 005. You can use any flowers you want.

STEP 6:
Paint the Chipboard die-cut FOREVER BLESSED DC85 004 using white gesso. Once dry, separate the frame from the phrase.

STEP 7:
To the paper cluster, vertically attach a strip of lace. Add the photo using double-sided tape. Stick some floral bristle under it before attaching.

STEP 8:
Add flowers filling in the gaps between them with floral twigs and bristle.

STEP 9:
Randomly, dab glue around the cluster and sprinkle white grit, silver micro-beads and pearl beads all over.

STEP 10:
Finally, attach the Silver embellishment – oyster shell E7 069 and both elements of the Chipboard die-cut FOREVER BLESSED DC85 004.


Done!


C87 Journey in Time Collection Card by Bev Code


FOR THIS CARD YOU WILL NEED:
Paper: C87 Journey Collection Card Kit
Accent: Metal Bicycle
Other: Cardstock, twine, black micron pen

INSTRUCTIONS:
STEP 1:  Make your card base out of cardstock. Make a single cardstock base slightly smaller for the front panel to work on.
STEP 2:  Using the card kit pull at least 3 coordinating pattern papers to start your layers. I used a large print background, a smaller box size next and using the border bicycle print cut a strip for the front layer.
Put the 3 layers together and then add the rounds of twine…. before gluing to the main base.
STEP 3: add the metal accent
STEP 4: Using a black pen Doodle adding the lines around the corners of the papers…. some small, some longer and some all the way around. Just this addition of lines adds depth and dimension to the project.
STEP 5: If you like to accent the inside of the card to write the verse on …. Use the matching paper to give a base layer to work on. A touch of doodling is a great finishing touch too.


Thursday, 28 July 2016

C85 SHABBY ROSE COLLECTion
- byTanya Cloete
- Bird Cage


For This Project You Will Need:

·         FabScraps Shabby Rose Collection paper range : C85 005, 006 & 008
·         FabScraps Chipboard Pieces : DC 85 006 & 013
·         Silhouette Cameo
·         Creative Expression Dies Grand & Petite Vinery
·         Couture Creations Die Classic Leaf
·         Memory Box Die Lunette Butterfly
·         Grey & Pink Cardstock
·         Ranger Embossing Powder White
·         Lindy’s Stamp Gang Embossing Powder Chateau Rosé & Merci Beaucaup Mint
·         White & Mint Acrylic Paint
·         Metal Embellishments, Flowers, Rhinestones, String Pearls, Heart Wreaths, Wooden Bird, Lace &Trims

Instructions:
1.      Silhouette Cameo:
·         Cut a large bird cage from sheet 005, 006 and 008 as well as from grey cardstock. The grey cardstock is optional I used it for the bottom section and the ‘lid’ of the cage just to make it a little more sturdy!
·         Assemble accordingly.
·         Cut 8 flowers from the remaining sheets to make paper roses.  Remember to cut 3 of each of the same size.  Mine are various sizes so you can choose how big or small you want yours to be.  Assemble the paper roses…you can follow this link on how to make the paper roses https://www.youtube.com/watch?v=skuSJcYNC3E.
·         Randomly paint the paper roses with white paint.
2.      Cut 2 hinges from sheet 008 and paint the edges with white paint.
3.      Cut 4 leaves using the grand & petite vinery dies from pink cardstock and randomly paint with white paint.
4.      Cut 4 leaves using the classic leaf die from the remaining sheets of the bird cage.
5.      Cut 2 butterflies using the Lunette die from sheets 005 and 006. Add the mini rhinestones to the centre.
6.      Emboss the wooden bird with Chateau Rosé on the one side and Merci Beaucaup Mint on the other. Let in hang in the centre of the bird cage.
7.      Snip the word (Home) from chipboard piece 006 and emboss with white.
8.      Emboss chipboard piece 013 with white and add the hinges.
9.      Paint 2 of the wreath hearts with white paint and the other 2 with mint.
10.  Arrange the rest of the embellishments as per the picture and glue!
11.  All Done!